
Contents
How to Fix Windows Key Not Working Issue Troubleshooting Guide

If you’ve ever encountered the frustrating error of your Windows key not working, you’re not alone. The Windows key, also known as the start menu key, is an essential part of navigating your computer and accessing important features. When this key stops working, it can be incredibly frustrating and hinder your productivity. But fear not, there are several troubleshooting steps you can take to fix this issue.
The first thing you should try is simply pressing the Windows key multiple times. Sometimes, the key may be stuck or not registering properly, and a few quick presses can fix the problem. If that doesn’t work, try pressing the key in combination with other keys, such as Ctrl or Alt. This can sometimes trigger the key to start working again.
If pressing the key doesn’t fix the issue, you can try restarting your computer. This can help reset any temporary glitches or errors that may be causing the key to stop working. Simply click on the Start menu, select the Power option, and choose Restart. Once your computer has rebooted, try pressing the Windows key again to see if it’s working.
If restarting doesn’t solve the problem, you can try updating your keyboard drivers. Outdated or corrupt drivers can cause various issues with your keyboard, including the Windows key not working. To update your drivers, go to the manufacturer’s website and search for the latest drivers for your keyboard model. Download and install the drivers, then restart your computer and test the Windows key.
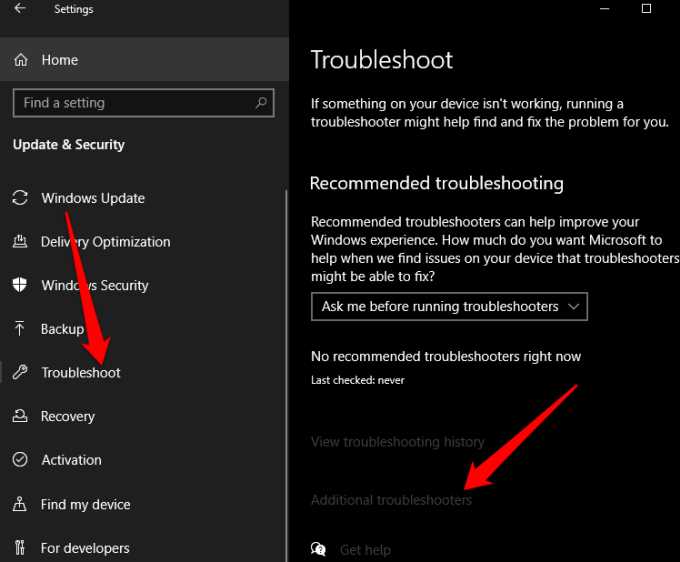
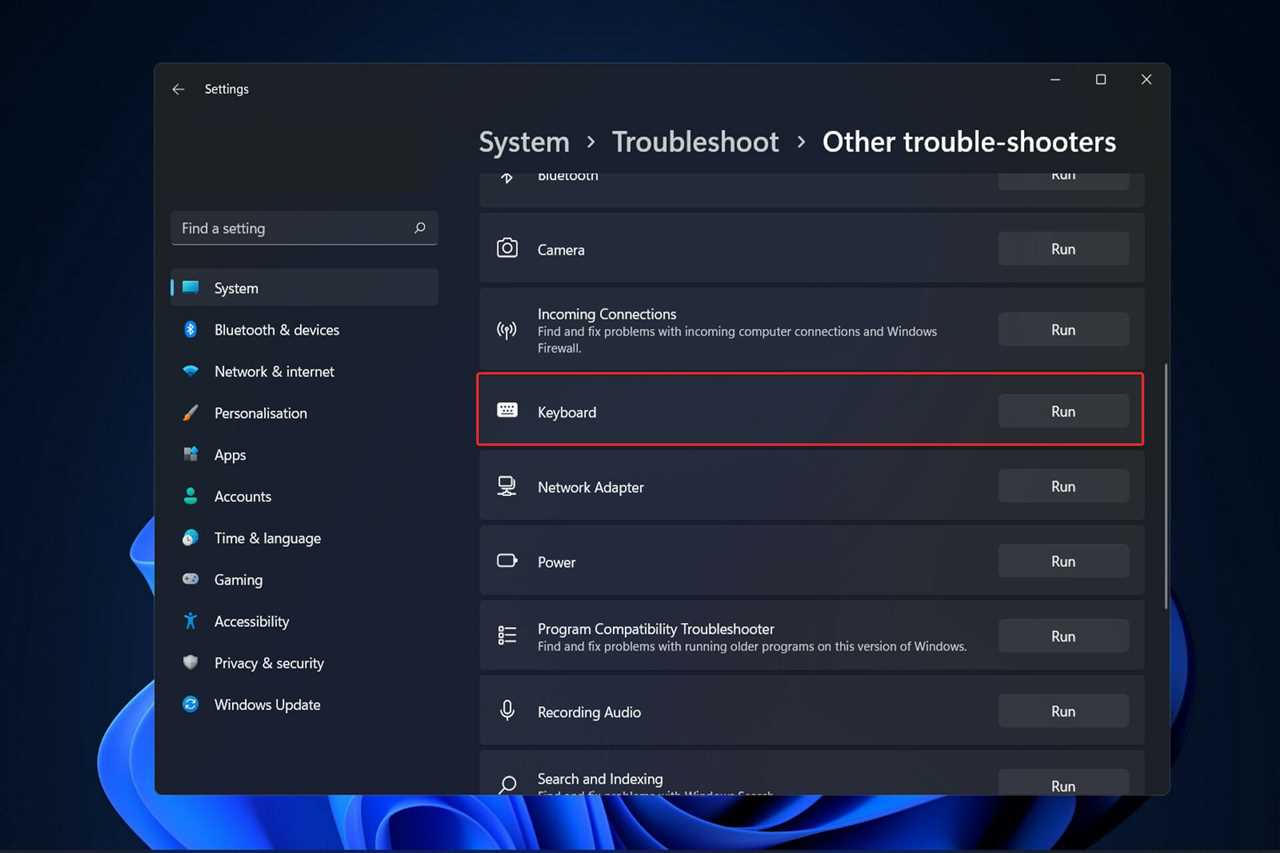
If none of these troubleshooting steps fix the issue, you may need to consider a more advanced solution. One option is to use the Windows key troubleshooter, which can automatically detect and fix common issues with the Windows key. To access the troubleshooter, go to the Control Panel, select Troubleshooting, and click on Keyboard. Follow the on-screen instructions to run the troubleshooter and see if it resolves the issue.
In conclusion, the Windows key not working can be a frustrating issue, but there are several troubleshooting steps you can take to fix it. Start by pressing the key multiple times and in combination with other keys. If that doesn’t work, try restarting your computer and updating your keyboard drivers. If all else fails, use the Windows key troubleshooter. With a little patience and persistence, you can get your Windows key working again and regain full control of your computer.
Check for Physical Issues

If your Windows key is not working, it could be due to physical issues with your keyboard. To fix this problem, you should check for any physical damage or obstructions that may be preventing the key from working properly.
Here are some steps to check for physical issues:
- Inspect the Windows key: Take a close look at the Windows key on your keyboard. Check if there are any signs of damage, such as cracks or missing pieces. If you notice any physical damage, you may need to replace the key or the entire keyboard.
- Clean the keyboard: Dust, dirt, and debris can accumulate over time and affect the performance of your keys. Use a can of compressed air or a soft brush to clean the area around the Windows key. Be gentle to avoid causing any further damage.
- Check for stuck keys: Sometimes, a stuck key can cause issues with other keys on the keyboard, including the Windows key. Press each key on your keyboard to make sure they are not sticking. If you find a stuck key, gently press it several times to try and release it.
- Restart your computer: A simple restart can often fix minor software issues that may be causing the Windows key to not work. Press the Start button, select Restart, and wait for your computer to reboot.
If you have followed these steps and the Windows key is still not working, there may be a more complex software or hardware issue that requires further troubleshooting. In such cases, it is recommended to seek professional help or contact the manufacturer for assistance.
Note: The steps provided in this guide are general troubleshooting suggestions and may not solve every instance of the Windows key not working. It is always a good idea to backup your data before attempting any fixes to avoid potential data loss.
Clean the Keyboard
If the Windows key is not working, it might be due to dirt or debris accumulated on the keyboard. Cleaning the keyboard can help fix this issue. Follow the steps below to clean your keyboard:
- Turn off your computer to avoid any accidental key presses.
- Disconnect the keyboard from your computer by unplugging the USB cable.
- Hold the keyboard upside down and gently shake it to remove any loose debris or crumbs.
- Use a can of compressed air to blow away any remaining dirt or dust between the keys.
- If there are any sticky or stubborn dirt, you can use a cotton swab dipped in isopropyl alcohol to clean the affected areas.
- Allow the keyboard to dry completely before reconnecting it to your computer.
- Reconnect the keyboard to your computer by plugging in the USB cable.
- Turn on your computer and test if the Windows key is now working.
Note: It is important to clean your keyboard regularly to prevent any build-up of dirt or debris that can cause keys to become unresponsive. Additionally, make sure to follow the manufacturer’s instructions for cleaning your specific keyboard model.
Check for Loose Connections

If your Windows key is not working, one of the possible reasons could be a loose connection. To fix this error, you should check if the keyboard is properly connected to your computer.
Follow these steps to check for loose connections:
- Start by turning off your computer. This will ensure that you don’t accidentally press any key while checking the connections.
- Disconnect the keyboard cable from the computer. Carefully unplug the keyboard cable from the USB port or PS/2 port, depending on the type of keyboard you have.
- Inspect the cable for any visible damage. Look for any frayed wires or bent pins that may be causing the issue.
- Clean the connectors. If there is any dirt or debris on the connectors, use a soft cloth or cotton swab dipped in rubbing alcohol to clean them.
- Reconnect the keyboard cable. Plug the keyboard cable back into the USB port or PS/2 port firmly. Make sure it is inserted all the way in.
- Turn on your computer. Once the keyboard is connected, start your computer and check if the Windows key is now working.
If the Windows key still doesn’t work after checking for loose connections, you may need to try other troubleshooting methods to fix the issue.
Replace the Keyboard

If the Windows key is still not working after trying the above solutions, it is possible that the key itself is faulty or damaged. In this case, you may need to replace the keyboard to fix the issue.
Here are the steps to replace the keyboard:
- Start by turning off your computer and unplugging it from the power source.
- Locate the screws on the back of your laptop or the bottom of your desktop keyboard that secure the keyboard in place.
- Use a screwdriver to remove the screws and carefully lift the keyboard away from the computer.
- Disconnect the ribbon cable or connector that connects the keyboard to the motherboard.
- Take note of the type and model of your keyboard and purchase a replacement keyboard that is compatible with your computer.
- Connect the new keyboard to the motherboard by plugging in the ribbon cable or connector.
- Place the keyboard back into position and secure it with the screws.
- Plug your computer back into the power source and turn it on.
If the Windows key still does not work after replacing the keyboard, it may indicate a deeper issue with your computer’s hardware or software. In this case, it is recommended to seek professional assistance or contact the manufacturer for further troubleshooting.
Update Keyboard Drivers

If your Windows key is not working, it could be due to outdated or corrupt keyboard drivers. Updating the keyboard drivers can help fix this issue.
Here’s how you can update the keyboard drivers:
- Press the Windows key + X on your keyboard to open the Start menu.
- Select “Device Manager” from the menu.
- In the Device Manager window, expand the “Keyboards” category.
- Right-click on your keyboard device and select “Update driver”.
- Choose the option to search automatically for updated driver software.
- Windows will now search for the latest driver for your keyboard and install it.
- Once the driver update is complete, restart your computer.
After the restart, check if the Windows key is now working. If not, you can try uninstalling the keyboard drivers and then reinstalling them using the same steps mentioned above.
If updating or reinstalling the keyboard drivers did not fix the issue, there may be a hardware problem with your keyboard. In such cases, you may need to consider replacing the keyboard or contacting a professional for further assistance.
Use Device Manager to Update Drivers

If you are experiencing an error where your Windows key is not working, you may need to update your drivers. The Windows key is an essential part of navigating the Windows menu and starting various functions, so it is important to fix this issue as soon as possible. One way to resolve this problem is by using the Device Manager tool.
Here are the steps to update drivers using Device Manager:
- Press the Windows key + R to open the Run dialog box.
- Type “devmgmt.msc” and press Enter to open the Device Manager.
- In the Device Manager window, expand the category for which you want to update the driver. For example, if you are having issues with your keyboard, expand the “Keyboards” category.
- Right-click on the device that is not working correctly and select “Update driver”.
- Choose the option to automatically search for updated driver software. Windows will then search for the latest driver online and install it.
- Restart your computer to apply the changes.
This process will update the drivers for the selected device, which may resolve any issues with the Windows key not working. If there are no available updates or if updating the drivers does not fix the problem, you may need to try other troubleshooting methods.
Using Device Manager to update drivers is a simple and effective way to resolve issues with the Windows key not working. It ensures that you have the latest drivers installed, which can help improve the performance and functionality of your device.
Download and Install Latest Drivers
If you are experiencing an error with your Windows key not working when you press it, one possible solution is to download and install the latest drivers for your keyboard.
Outdated or incompatible drivers can sometimes cause issues with certain keys on your keyboard, including the Windows key. By updating your drivers, you can ensure that your keyboard is functioning properly and that all keys are working as they should.
To download and install the latest drivers for your keyboard, follow these steps:
- Identify the make and model of your keyboard. This information is usually located on the back or bottom of the keyboard.
- Go to the manufacturer’s website. Most keyboard manufacturers have a support section on their website where you can find drivers and software for their products.
- Search for your keyboard model. Use the search function on the manufacturer’s website to find the drivers and software specifically designed for your keyboard model.
- Download the latest drivers. Look for the latest version of the drivers for your keyboard and download them to your computer. Make sure to choose the appropriate drivers for your operating system (e.g., Windows 10, Windows 8, etc.).
- Install the drivers. Once the drivers are downloaded, locate the file on your computer and double-click it to start the installation process. Follow the on-screen instructions to complete the installation.
After the drivers are installed, restart your computer to apply the changes. Once your computer has restarted, try pressing the Windows key again to see if it is now working properly.
If the Windows key is still not working after updating your drivers, you may need to try other troubleshooting steps to fix the issue.
Note: It is important to download drivers only from the official manufacturer’s website to ensure their authenticity and compatibility with your keyboard.
Disable Gaming Mode or Hotkey Software

If your Windows key is not working, it could be due to gaming mode or hotkey software that you have installed on your computer. These software programs are designed to disable certain keys, including the Windows key, while you are playing games or using specific applications. Disabling these programs can help fix the issue.
To disable gaming mode or hotkey software, follow these steps:
- Open the menu by pressing the Windows key.
- Search for “Task Manager” and open it.
- Click on the “Startup” tab.
- Look for any gaming mode or hotkey software in the list.
- Select the software and click on the “Disable” button.
- Restart your computer.
Disabling the gaming mode or hotkey software will prevent it from running automatically when you start your computer. This should fix the issue with the Windows key not working.
If the issue persists, you can try uninstalling the gaming mode or hotkey software completely. To do this, follow these steps:
- Open the menu by pressing the Windows key.
- Search for “Control Panel” and open it.
- Click on “Uninstall a program” under the “Programs” category.
- Look for the gaming mode or hotkey software in the list.
- Select the software and click on the “Uninstall” button.
- Follow the on-screen instructions to complete the uninstallation process.
- Restart your computer.
By disabling or uninstalling the gaming mode or hotkey software, you should be able to fix the Windows key not working error on your Windows computer.
Disable Gaming Mode

If your Windows key is not working, it could be because the gaming mode is enabled on your computer. Gaming mode is a feature that disables certain keys, including the Windows key, to prevent accidental interruptions while playing games. However, this feature can sometimes cause issues and prevent the Windows key from functioning properly.
To fix this issue, you need to disable the gaming mode on your computer. Here are the steps to do so:
- Press the Start menu button on your keyboard.
- Type “Settings” and press Enter to open the Settings app.
- In the Settings app, click on “Gaming” to open the Gaming settings.
- On the left sidebar, click on “Game Mode”.
- In the Game Mode settings, toggle the switch under “Game Mode” to Off.
Once you have disabled the gaming mode, the Windows key should start working again. If you are still experiencing the “Windows key not working” error, you can try other troubleshooting methods to fix the issue.
Uninstall Hotkey Software
If you are experiencing issues with your Windows key not working, one possible cause could be conflicting hotkey software installed on your computer. Hotkey software is designed to customize the behavior of certain keys on your keyboard, including the Windows key. However, sometimes this software can cause errors and prevent the Windows key from functioning properly.
To fix this issue, you can try uninstalling the hotkey software on your computer. Here’s how:
- Click on the Start button in the bottom left corner of your screen.
- Type “Control Panel” in the search bar and press Enter.
- In the Control Panel window, click on “Programs” or “Programs and Features”.
- Look for the hotkey software in the list of installed programs.
- Click on the hotkey software and then click on “Uninstall” or “Remove”.
- Follow the on-screen prompts to complete the uninstallation process.
Once the hotkey software is uninstalled, restart your computer and check if the Windows key is now working properly. If the issue persists, you may need to try other troubleshooting methods to fix the problem.
Modify Registry Settings
If the Windows key is not working on your keyboard, you can try modifying the registry settings to fix the issue. However, before making any changes to the registry, it is important to create a backup to avoid any potential system errors.
To modify the registry settings, follow these steps:
- Press the Windows key + R on your keyboard to open the Run dialog box.
- Type regedit and press Enter to open the Registry Editor.
- In the Registry Editor, navigate to the following key: HKEY_CURRENT_USER\Software\Microsoft\Windows\CurrentVersion\Policies\Explorer
- If the Explorer key does not exist, you will need to create it. Right-click on the CurrentVersion key, select New, and then click on Key. Name the new key Explorer.
- With the Explorer key selected, right-click on the right-hand side of the window, select New, and then click on DWORD (32-bit) Value. Name the new value NoWinKeys.
- Double-click on the NoWinKeys value and set its Value data to 0. Click OK to save the changes.
- Close the Registry Editor and restart your computer.
After restarting your computer, check if the Windows key is now working. If the issue persists, you may need to try other troubleshooting methods.
Note: Modifying the registry settings can be risky and may cause system errors if not done correctly. It is recommended to create a backup of your registry before making any changes.
FAQ about topic How to Fix Windows Key Not Working Issue: Troubleshooting Guide
Why is my Windows key not working?
There can be several reasons why your Windows key is not working. It could be due to a hardware issue, such as a faulty keyboard or a stuck key. It could also be caused by a software problem, such as a conflicting program or a corrupt system file. Additionally, the Windows key may be disabled in the system settings.
How can I fix the Windows key not working issue?
There are several troubleshooting steps you can try to fix the Windows key not working issue. First, check if the issue is with your keyboard by testing it on another computer or using a different keyboard on your computer. If the keyboard is not the problem, try restarting your computer or updating your keyboard driver. You can also try running a system file checker scan or performing a system restore to a previous working state. If none of these solutions work, you may need to contact technical support for further assistance.
Can I remap the Windows key to another key?
Yes, it is possible to remap the Windows key to another key using third-party software. There are various programs available that allow you to customize your keyboard settings and remap keys. One popular option is AutoHotkey, which is a free and open-source scripting language for Windows. With AutoHotkey, you can create custom scripts to remap keys, including the Windows key. However, it is important to note that remapping keys may have unintended consequences and could cause compatibility issues with certain programs or functions.
Is there a way to enable the Windows key if it is disabled?
Yes, you can enable the Windows key if it is disabled in the system settings. To do this, open the “Settings” app on your computer and go to the “Ease of Access” section. Then, click on “Keyboard” and make sure the “Use the Windows logo key” option is turned on. If it is already enabled and the Windows key is still not working, you may need to try other troubleshooting steps or seek technical support.


