
Contents
- 1 How to Cancel Amazon Subscriptions A Step-by-Step Guide
- 1.1 Section 1: Accessing Your Amazon Account
- 1.2 Section 2: Managing Your Subscriptions
- 1.3 FAQ about topic How to Cancel Amazon Subscriptions: A Step-by-Step Guide
- 1.3.1 How can I cancel my Amazon Prime subscription?
- 1.3.2 Can I cancel my Amazon subscriptions through the mobile app?
- 1.3.3 What happens if I cancel my Amazon subscription before the end of the billing cycle?
- 1.3.4 Is there a fee for canceling my Amazon subscriptions?
- 1.3.5 Can I reactivate a canceled Amazon subscription?
- 1.4 Video:How to Cancel Amazon Subscriptions A Step-by-Step Guide
How to Cancel Amazon Subscriptions A Step-by-Step Guide

Amazon offers a wide range of services and subscriptions to enhance your experience as a member. However, there may come a time when you need to cancel a subscription. Whether it’s because you no longer need the service or want a refund, unsubscribing from a membership is a straightforward process.
To cancel an Amazon subscription, you’ll need to access your Amazon account’s settings. First, log in to your account and navigate to the “Your Account” page. From there, locate the “Memberships & Subscriptions” section and click on it. This will take you to a page where you can manage all your subscriptions.
On the “Memberships & Subscriptions” page, you’ll see a list of all the subscriptions tied to your Amazon account. Find the subscription you wish to cancel and click on the “Manage Subscription” button next to it. This will open a new page with details about your subscription, including billing information and renewal dates.
To proceed with canceling the subscription, look for the “Cancel Subscription” option and click on it. You may be prompted to provide a reason for canceling, but this step is optional. After confirming your decision, you’ll receive a confirmation email stating that your subscription has been successfully canceled.
It’s important to note that canceling a subscription will not automatically result in a refund. If you are eligible for a refund, you will need to contact Amazon customer service to initiate the refund process. Be sure to check the terms and conditions of your subscription to understand the refund policy before canceling.
By following these simple steps, you can easily cancel any Amazon subscription that you no longer require. Remember to review your account’s billing details to ensure that you are not charged for any unwanted subscriptions in the future. Taking control of your subscriptions will help you manage your expenses and ensure that you only pay for the services you truly need.
Section 1: Accessing Your Amazon Account

To cancel your Amazon subscriptions, you will need to access your Amazon account. Follow the steps below to access your account:
- Go to the Amazon website (www.amazon.com)
- Click on the “Account & Lists” option located at the top right corner of the page.
- If you are not already signed in, enter your email address and password to sign in to your Amazon account.
- Once signed in, hover over the “Account & Lists” option again and a drop-down menu will appear.
- Click on the “Your Account” option from the drop-down menu.
- On the “Your Account” page, scroll down to the “Digital content and devices” section.
- Under the “Digital content and devices” section, click on the “Manage Your Content and Devices” link.
- You will be redirected to a new page where you can manage your subscriptions, billing, and more.
Once you have accessed your Amazon account, you will be able to view and manage your subscriptions. From this page, you can easily cancel, refund, or unsubscribe from any unwanted subscriptions or memberships.
Step 1: Open the Amazon website

To cancel your Amazon subscriptions, you will need to start by opening the Amazon website. You can do this by typing www.amazon.com into the address bar of your web browser and pressing Enter.
Once the Amazon homepage loads, you will need to sign in to your Amazon account. If you don’t already have an account, you will need to create one.
After signing in, locate the “Your Account” dropdown menu at the top right corner of the page. Click on it to expand the menu, and then select “Your Memberships & Subscriptions” from the list of options.
This will take you to a page where you can manage all your subscriptions and memberships on Amazon.
On the “Your Memberships & Subscriptions” page, you will see a list of all your active subscriptions. Find the subscription you want to cancel and click on the “Manage Subscription” button next to it.
On the subscription management page, you will find information about your subscription, including the renewal date and the price. Look for the option to cancel the subscription and click on it.
Follow the prompts to confirm the cancellation. Depending on the subscription, you may be eligible for a refund if you cancel within a certain timeframe.
Once you have successfully cancelled your subscription, you will receive a confirmation email from Amazon. Make sure to check your email for this confirmation.
Remember to unsubscribe from any additional services or newsletters associated with the subscription to fully cancel your account.
That’s it! You have now successfully cancelled your Amazon subscription. Make sure to keep track of any future subscriptions to avoid any unwanted charges.
Step 2: Sign in to your Amazon account

To unsubscribe from any Amazon service, you will need to sign in to your Amazon account. This step is necessary to access your account settings and manage your billing information, subscriptions, and memberships.
Follow these simple steps to sign in to your Amazon account:
- Go to the Amazon website (www.amazon.com) in your web browser.
- Click on the “Sign In” button located at the top right corner of the homepage.
- Enter your email address or mobile number associated with your Amazon account in the provided field.
- Click on the “Continue” button.
- Enter your Amazon account password in the provided field.
- Click on the “Sign In” button.
If you have forgotten your password, you can click on the “Forgot your password?” link and follow the instructions to reset it.
Once you have successfully signed in to your Amazon account, you will have access to your account settings and be able to manage your billing information, subscriptions, and memberships. From here, you can proceed to cancel your desired subscription and request a refund if applicable.
Step 3: Go to Your Account settings

Once you have identified the subscription that you wish to cancel, the next step is to navigate to your account settings on Amazon. Follow these simple steps to access your account settings:
- Open a web browser and go to the Amazon website.
- Sign in to your Amazon account using your email address and password.
- Hover over the “Account & Lists” tab located at the top right corner of the page.
- In the drop-down menu, click on “Your Account” to access your account settings.
By accessing your account settings, you will have access to various options and settings related to your Amazon account, including your billing information, service and membership details, and subscriptions.
It is important to note that canceling a subscription does not automatically entitle you to a refund. The availability of a refund will depend on the specific terms and conditions of the subscription you are canceling. It is recommended to review the cancellation and refund policy of the subscription before proceeding.
To cancel a subscription, locate the “Your Memberships & Subscriptions” section within your account settings. This section will provide you with a list of all your active subscriptions. Click on the “Manage Subscription” or “Cancel Subscription” button next to the subscription you wish to unsubscribe from.
Follow the prompts and confirm your decision to cancel the subscription. Once canceled, you will no longer be billed for the service, and your access to the subscription benefits will be terminated.
Remember to review your account settings periodically to ensure that you are not subscribed to any unwanted services or memberships. This will help you avoid unnecessary charges and keep your Amazon account up to date.
Section 2: Managing Your Subscriptions

Managing your subscriptions on Amazon is a straightforward process that allows you to have full control over your membership and billing. Whether you want to cancel a subscription, request a refund, or make changes to your account, Amazon provides an easy-to-use interface to help you manage your subscriptions.
To manage your subscriptions on Amazon, follow these steps:
- Sign in to your Amazon account.
- Click on “Account & Lists” in the top-right corner of the Amazon homepage.
- From the dropdown menu, select “Your Account”.
- Scroll down to the “Memberships & Subscriptions” section and click on “Manage Your Subscriptions”.
On the “Manage Your Subscriptions” page, you will see a list of all your active subscriptions. This includes services like Amazon Prime, Amazon Music, and Amazon Video, as well as any other subscriptions you have signed up for through Amazon.
To cancel a subscription, simply click on the “Cancel” button next to the subscription you wish to cancel. Follow the prompts to confirm the cancellation.
If you are eligible for a refund for a cancelled subscription, you will see an option to request a refund. Click on the “Request Refund” button and follow the instructions provided.
Additionally, you can use the “Manage Subscription” button to make changes to your subscription. This may include upgrading or downgrading your subscription plan, changing your billing information, or updating your delivery preferences.
It is important to note that cancelling a subscription does not automatically delete your account. If you wish to completely remove your account from Amazon, you will need to follow the account closure process separately.
By following these steps, you can easily manage your subscriptions on Amazon and ensure that you have full control over your account and billing.
Step 4: Click on the “Memberships & Subscriptions” tab

Once you are logged into your Amazon account, you will need to navigate to the “Memberships & Subscriptions” section to manage your billing and cancel any unwanted subscriptions. Follow the steps below:
- Go to the Amazon homepage and sign in to your account using your email address and password.
- Click on the “Account & Lists” dropdown menu located at the top right corner of the page.
- Select “Your Memberships & Subscriptions” from the dropdown menu.
By clicking on the “Memberships & Subscriptions” tab, you will be redirected to a page where you can view and manage all your current subscriptions and memberships.
On this page, you will see a list of all the subscriptions associated with your Amazon account. The list will include details such as the name of the subscription, the billing frequency, and the next payment date.
To cancel a subscription, locate the subscription you wish to cancel and click on the “Cancel” or “Unsubscribe” button next to it. Follow any additional prompts or instructions to confirm the cancellation.
Please note that cancelling a subscription does not guarantee a refund, as it depends on the specific terms and conditions of the subscription. If you are eligible for a refund, it will be processed according to Amazon’s refund policy.
Once you have cancelled a subscription, it will no longer appear in your list of active subscriptions. However, you may still have access to the subscription until the end of the current billing period.
It is important to regularly review your Amazon account for any unwanted subscriptions to avoid unnecessary charges. By following these steps, you can easily manage your subscriptions and keep your account up to date.
Step 5: Select the subscription you want to cancel

Once you have accessed your Amazon account and navigated to the “Your Memberships & Subscriptions” page, you will see a list of all your current subscriptions. This page allows you to manage and cancel any subscriptions associated with your account.
To cancel a specific subscription, follow these steps:
- Scroll through the list of subscriptions until you find the one you want to cancel.
- Click on the subscription to select it.
- Review the details of the subscription to ensure you have selected the correct one.
- Look for the “Cancel Subscription” or “Cancel Membership” option and click on it.
- Follow any additional prompts or instructions to confirm the cancellation.
It’s important to note that canceling a subscription may not result in an immediate refund. The availability of a refund will depend on the specific terms and conditions of the service you are canceling. Some subscriptions may offer a prorated refund for any unused portion of the subscription period, while others may not offer any refunds at all.
Additionally, canceling a subscription will stop any future billing for that service, but it will not necessarily remove any past charges or billing history from your account. Be sure to review your account and billing history to ensure that there are no outstanding charges or issues related to the subscription you are canceling.
By following these steps, you can easily cancel any unwanted subscriptions associated with your Amazon account.
FAQ about topic How to Cancel Amazon Subscriptions: A Step-by-Step Guide
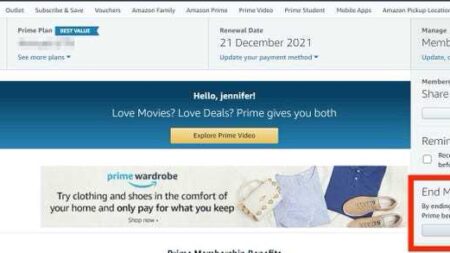
How can I cancel my Amazon Prime subscription?
To cancel your Amazon Prime subscription, go to the “Your Account” section on the Amazon website. Under the “Account & Lists” menu, select “Your Prime Membership.” On the Prime Membership page, click on the “End Membership and Benefits” button. Follow the prompts to confirm the cancellation. Once you cancel, you will no longer have access to the benefits of Amazon Prime.
Can I cancel my Amazon subscriptions through the mobile app?
Yes, you can cancel your Amazon subscriptions through the mobile app. Open the app and tap on the menu icon in the top-left corner. Scroll down and tap on “Your Account.” Under the “Digital Content and Devices” section, tap on “Amazon Subscriptions.” Select the subscription you want to cancel and tap on “Cancel Subscription.” Follow the prompts to confirm the cancellation.
What happens if I cancel my Amazon subscription before the end of the billing cycle?
If you cancel your Amazon subscription before the end of the billing cycle, you will still have access to the subscription benefits until the end of the current billing period. However, you will not be charged for the next billing period, and your subscription will not renew automatically. Once the current billing period ends, you will lose access to the subscription benefits.
Is there a fee for canceling my Amazon subscriptions?
No, there is no fee for canceling your Amazon subscriptions. You can cancel them at any time without incurring any additional charges. However, keep in mind that if you cancel a subscription before the end of the current billing period, you will not receive a refund for any unused portion of the subscription.
Can I reactivate a canceled Amazon subscription?
Yes, you can reactivate a canceled Amazon subscription. To do so, go to the “Your Account” section on the Amazon website or app. Under the “Account & Lists” menu, select “Your Prime Membership” or “Amazon Subscriptions.” Look for the option to reactivate your subscription and follow the prompts to complete the reactivation process. Keep in mind that you may need to provide payment information again if your previous payment method is no longer valid.


